When Things go Bump in the Night

This year I moved up into a new position at my job. This is a great thing because it came with a raise as well as a new avenue to explore at my job. However it also came with more responsibilities and a later work schedule. Last night I got home from work around 10:00 p.m., much later than I usually get home. I had a full day at work and knew that I was in for the exact same thing today. Plus I wanted to prepare some meals for the weekend. Lately I have been slacking off with my meal preparations around Thursday and letting that run through Sunday resulting in us eating out more. So both of these things were on my mind and causing me to have a hard time sleeping.

To try to work through this I was doing my sleepy time yoga in bed to help and calm my body while releasing some tension. Fortunately the hubs is a fairly heavy sleeper, so I rarely bother him with this. As I got ready to sleep again I saw that worst thing that one can see while lying in bed. A giant, no I mean GIANT bug crawling up the wall. If you want to know what this bug looked like google “madagascar hissing beetle”. Now I’m sure that this isn’t what it really was, but when I saw it the vision immediately took me back to elementary school science and pictures of these little devils!

Of course I had no choice but to jump out of bed screaming at 5:00 a.m. and woke up my husband. He looked at the wall, freaked out and jumped out of bed too. (Did I mention that our bed is up against this wall?) At this point we had 2 choices. Ask this creature to pay rent if he wanted to stay or evict him NOW! We chose the eviction. My husband likes to spray bugs and watch them die so he doesn’t have to touch them while they are alive. However I am doing my best to keep this house as “natural” as possible. So all of our household cleaners are made out of vinegar, baking soda, witch hazel, essential oils and such. He says that these things only, “give bugs more power” and that “they would just go and tell their friends that we serve great cocktails at our apartment.” Funny…not.

Our first plan was to capture the bug in a cup with a postcard to seal it. This worked, but right before he got it out the door the thing flew out of the cup. You heard me, FLEW! He flew right under our desk and then crawled under the bed where we store things. (Remember we have a tiny apartment.) At that point I’m screaming just grab it! He’s saying I have to spray it! We had reached a conundrum. We got out the flashlight and found that he was hiding in a box under the bed. At that point I’m asking him why we have an empty cardboard box under the friggin bed?!?! He says, well if we had some Raid this wouldn’t even be a problem.

Finally we ended up moving our mattress and then sealing the box under the bed. Together we slid the box from under the bed and then he picked the whole thing up and threw it outside. Before he could toss it I made him check to make sure the monster was in the box. After all of that we looked at each other and laughed. I decided to get up at that point and make my meals for the next couple days while he got ready for work. At that moment I realized something, this little incident could have easily resulted in a big fight where we blamed each other for our predicament. In the early days of our relationship it certainly would have. But it actually was a bit of a blessing because it gave us a chance to conquer something as a team. It also gave us time to chat a bit since my coming home late has taken away some of our talk time.

So NO this is NOT an invitation for Maddy (short for Madagascar hissing devil) to come back. But I’m glad that we were able to find the benefit of his presence.

Posted in Home Matters | Tagged , , , , , , | 1 Comment

No Judge Zone, No Judge Zone!

One of the most baffling things about going “natural” is all of the judgement that goes around. When I say natural I mean it in every sense of the word. Natural hair, natural health, natural living, natural household products, natural birth, all of it! For some, it seems like “living naturally” is more of a badge of honor to make one better than another rather than just a way to live a healthier, better life. My motive for trying to live more naturally was to reduce the amount of dangerous chemicals in my life. I have seen how everyday toxins can come together and cause problems in ones health. So for me it was obvious that some things in my life needed to change.

I do not feel like becoming more eco-aware or natural has to an all or nothing kind of thing. When you really get into it, it starts to seem like SO many RULES! Only eat this kind of food, homorne-free isn’t as good as organic, does your product label list everything as organic, what kind of container is it stored in, where was it packaged, do they test on animals, what factory or country did it come from, the list goes on! And we don’t even have to go into the expense of making this transition. In some ways it is more cost-effective, but some things can really put a dent in ones pocket.

To make this process more practical and accessible to the average person, it can and should be taken in steps. As we become more enlightened regarding the effects that synthetic products have on us, we can make changes along the way. Something is better than nothing and you have to do what is right for your situation, your family, and your life.

Yes there are some things that you will want to take away in totality as soon as possible. But if you see someone give a child gold fish cheese crackers rather than organic bunny cheese crackers do not get ready to tar and feather them! We are all learning and growing and doing our best to make the right decision for ourselves and our families. This goes for self judgement too! Yes you should constantly self-access to make sure you are doing your best. However you shouldn’t beat up on yourself for not living up to unrealistic standards. Oh and don’t try to live up to anyone else’s standards either.

Have you ever been judged for something in the natural world? Have you ever judged someone else? Let me know below!

Posted in Uncategorized | Tagged , , , , , , | Leave a comment

My Blow Out Experience using Shea Moisture’s Blow Out Cream (and some other GREAT products)

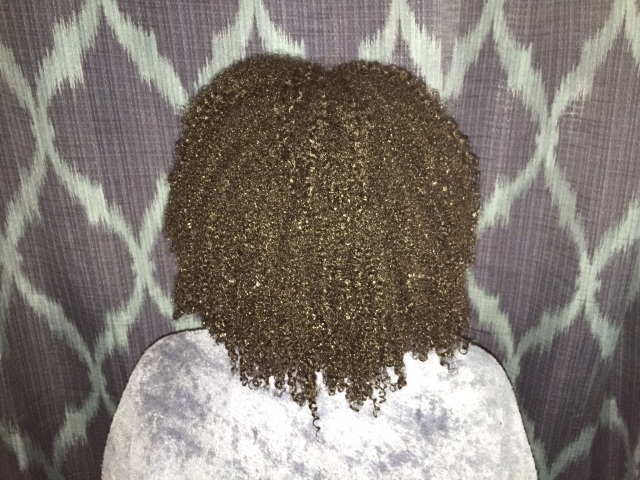
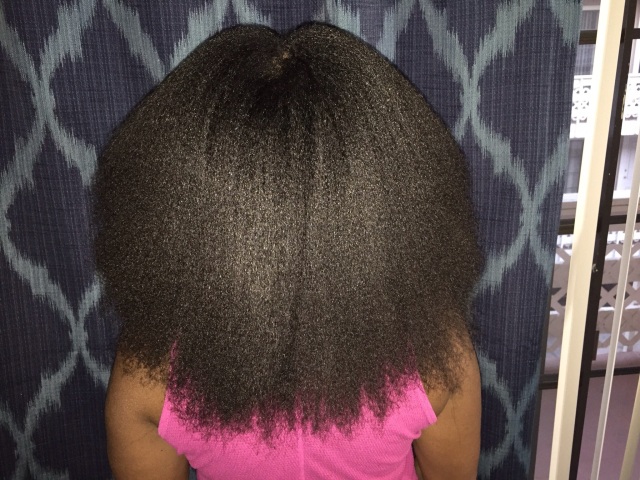
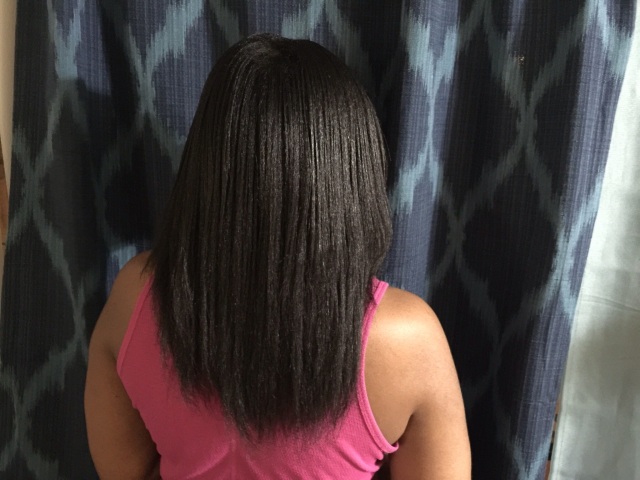
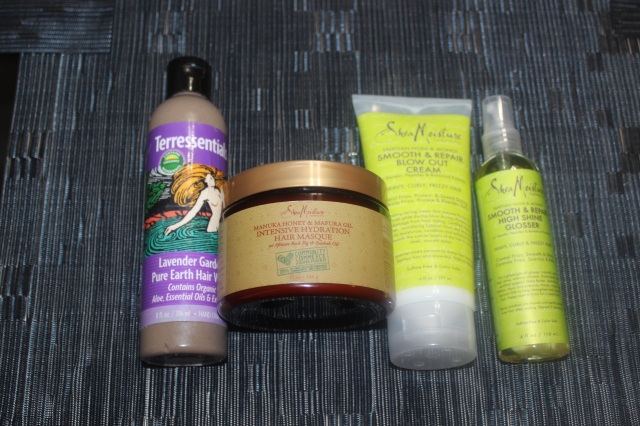
A few months ago I saw a review that Mahogany Curls did for Shea Moisture’s Blow Out Cream. At that moment I decided that I needed to try this stuff out. Previously I had a product line that I used that was really great for moisturizing and protecting my hair for straightened styles. But the company went out of business. Since then, I have been looking for replacement products. My blow outs and flat irons have not lived up to my expectations. So I was desperate to find a winner! I have had some great experiences with other Shea Moisture products and Mahogany Curls glowing review made me feel as though this could be a great product for me. The only problem was that I could not find it anywhere! So I made a post on Facebook and Instagram asking people to help me locate a bottle. Then a total stranger told me that she saw them at a Target in New York, and she would be willing to send me a bottle if I paid for it. Her YouTube page is here, feel free to check it out. I had her send me one. (A few days later I had a few friends locate the product in different stores around Southern California.) My hair needed some serious deep conditioning so I set out to find the right combination of products and the right routine that would help me reach my desired results. This video from Taren Guy’s salon series was very helpful in creating a plan for my blow out. Here are the products that I used. image   Terressentials Lavender Mud Wash– This is a product that I have been using for years to clean my hair. It is really moisturizing and makes my hair so soft. I didn’t even have to detangle my hair before applying it. I split my hair up into 4 sections. I sprayed my dry hair with distilled water with my (Naptural85 inspired) oil mix in it. Then I applied about half a palm full to each section making sure to work it into each section well. I covered it with a plastic cap and sat under my hooded dryer for 25 minutes. Shea Moisture Manuka Honey and Mafura Oil Intensive Hydration Masque- This was my first time trying this product and I LOVE it! After rinsing out my mud wash I applied this in the shower on each of the 4 sections making sure to work it in well all the way to the ends. A little of this goes a long way. The mud wash did a great job of getting out most of my big knots. But I used this to finger detangle any left over knots. I applied a different plastic cap and sat under the hooded dryer for 30 minutes. After that I rinsed it out. I wore the plastic cap on my head to make sure that my hair stayed wet. The next day I reapplied the masque and wore the plastic cap and a hat as I ran errands. I really wanted my hair to be well moisturized. My goal was to reduce that amount of breakage that I see when straightening my hair and also to increase the elasticity of my strands. I really think it worked! I also did a final rinse with some distilled water. I hear this is great for people who live in places with dry water. (Eventually I want to get a filtered shower head.) image   This is how my hair turned out. My curls were really popping and they were so much looser that they usually are after a wash. I almost wanted to just stop there and do a wash and go! But my job wasn’t done, I still had a few more steps to go. Shea Moisture Smooth and Repair Blow Out Cream- I tried to keep my hair as saturated with water as I could handle. I sectioned my hair again into 4 sections. (I don’t like leaving it in the sections to rinse. I just don’t feel like I can get all of the product out successfully.) I applied a quarter sized amount of the cream on each section. Then I broke those sections into smaller sections and I blow dried using a comb attachment. When I got to the last 2 sections I sprayed them with more distilled water to make sure that they were wet enough. The blow out process only too about 30 minutes. image   After blow drying I sectioned my hair again to flat iron it. Since the blow out cream is also a heat protectant I didn’t worry about applying anything else. My hair was not greasy like some products. But it still felt moisturized and strong. I used a ceramic flat iron, unfortunately it doesn’t tell me exactly what temp I was using. But I used 3 lower than the highest setting which was 8. I also used a flat iron comb to help me. I didn’t want my hair to be bone straight, I like my hair to have a little more body. The flat ironing process only took about 45 min. image   I needed to have my ends trimmed. So a friend of mine took care of that for me. image   Shea Moisture Smooth and Repair High Shine Glosser- I wanted to wear my hair curly since we were going to the our Godson’s baby dedication the following day. But I also didn’t want to use any more heat. So I used “curlformers” (I actually have the curlformer knockoffs but when I tried to find them to link them on Amazon they weren’t there any more.) I used the High Shine Glosser as well as some of my oil mix before applying the curlformers. I didn’t want to use any products with a heavy hold. Plus my ends were beginning to frizz up a bit. I hoped that this would help smooth things out a bit. I wore the “curlformers” over night. image   image   image   Here’s the finished product! I definitely wish I had some light hold hair spray to apply to my curls after removing the curlformers. I LOVED the way they looked. But they didn’t last very long at all. I still loved my hair though and I was really happy with the overall results. I will be using the same plan next time I want to straighten my hair. I feel like my hair was treated well, and I hope that I avoided heat damage. I will update this post once I wash my hair to let you know!

Edit 6/10/15 : I forgot to tell you all, my curls came back and I had no heat damage. Yeah baby!

Posted in Uncategorized | Tagged , , , , , , , , , , , , , | Leave a comment

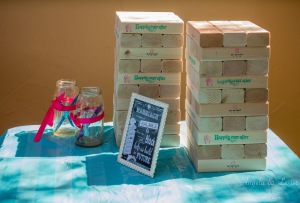
My DIY Giant Jenga Guestbook

Ok so I love me some Pinterest! Before I was even engaged I spent literally years adding things to my wedding board. These additions are what made my wedding special and unique. One of the things that I really wanted was a Giant Jenga game guestbook. I saw a few versions on-line. But they were all SO expensive. The cheapest one that I found was $90, and some even had an additional cost for shipping. I definitely was not willing to pay that much. So I set out to make one of my own!

I am not one of those girls that hangs out at Home Depot. I have a cute little pink tool kit. But I mainly just bought it for the hammer and screw drivers. The thought of making this little masterpiece was a bit daunting. I wouldn’t let myself be scared off though. I figured I’m a cute enough girl, not exactly the hottest chick on the planet. Probably not even the hottest girl in the Home Depot. But I should at least be to pull off the I’m just a girl in need of some advice thing pretty well. (Feminists, please don’t send any angry emails, we have to use what we have!)

Thanks to a coupleof  on-line tutorials like this, and this one, I had an idea of what type of wood I needed and the lengths needed as well. I walked in and started looking at the wood pieces. There were so many options! I ended up settling on 2x3x8 stud boards. I took them all over to the saw cutting guy and told him that I needed them cut to a certain size. After he cut about half of the wood, I realized that my measurements were WRONG! Ugh! The Home Depot guy was so nice though. He just cut them again once I figured out the right measurements. Since I already messed up the boards, we had to use a new size or 7.5 inches. This worked out well though because it meant less wood to have to lug around. I ended up with 63 game blocks.

image2

After he was done he told me to take to the front to pay. He told me that they usually charge per cut. But I didn’t have to tell them about all the extra cuts that he had to make. He was so nice and patient with me, I really appreciated it! When I got to the register the lady only charged me for the full pieces of wood, I also got some sand paper. The total cost was under $15, I was so stoked! This of course is much lower than the amount that I would have paid had I purchased a pre-made set.

Goree Wedding Goree Wedding Goree's Wedding Goree WeddingAs mentioned in a previous post, some friends of ours were SO sweet and they sanded and stamped them for us. We used these pens to write on the blocks. After the wedding, Lester used a spray wood sealant to make sure that the writing didn’t fade or get rubbed off.

I will not give you an exact how-to since I ended up getting this messed up a bit. But please check out the tutorials listed above so that you can get the exact measurements. This would be a great game to have for outdoor parties. It would also serve as a great gift for those who like to have game nights. So don’t be scared, if you want your own Giant Jenga set get out there and make one!

Posted in Uncategorized | Tagged , , , , , , | 1 Comment

What I Learned from Our First Year of Marriage

Lester and I have made it through our first year of marriage and I think we did it like some Bosses! I have definitely learned a lot about my husband, myself, and our relationship during this time. So here’s my takeaway from our last year together.

1. Your first year of marriage doesn’t have to be hard. I am NOT saying that this year has been easy. There have actually been some pretty trying moments that made us both take a pause and question some thangs! (See our first Christmas) But overall we both look back and think man, this marriage thing is pretty cool.

2. Get your life together super early and stop fighting for your rights! Your marriage is going to be extra challenging when your main concern is getting “what you deserve.” I promise you, the times that we have had the most trouble occurred when we were more concerned about getting our point across than hearing each other. If you are doing your best to put your spouse and their needs first and they are doing the same thing, then everyone is covered. Right?

3 Gangstas need love too! Ok, my husband (and I for that matter) is as far from whatever you imagine a “gangsta” would be. However my love always was the guy who didn’t need lots of cuddles and kisses. He said he didn’t always need to hear me say how much I love him and such. But as we got further into our marriage I really got to see his softer side. He likes to snuggle more now (even though he prefers not to call it that and he would never admit it to you) and he gets a cute little smile on his face when I say something nice about him. The big softie!

4. Sex is a powerful part of marriage that keeps our bond strong. Lester and I waited until we were married to have sex and live together. I am happy to know that we can sustain a solid relationship without sex. (Hopefully we will never have to though). However now we have this thing that connects us so strongly. This is something that was not shared with anyone else either. It’s so cool!

5. Never underestimate the power and importance of a Homemaking. I realize that this might not seem politically correct or progressive to some. That’s why this blog is called The Goree Truth, it’s the truth for my life. Even in 2015, a man really appreciates a woman who takes care of the home. Yep, that means cooking, cleaning, doing the laundry and such. I recently read this great article. In the article it states that when one spouse is more proactive regarding the housework, the other has a chance to focus on their career. Don’t get me wrong, I have my own goals and endeavors that Lester fully supports. Since he makes the bulk of the money to take care of our household responsibilities, I have the freedom to focus on the things that I want to do. Oh and this role does not only have to be for a wife.

6. Only YOU know what will work in YOUR marriage. There will always be people who want to tell you what you should do in your marriage. But no one can know all of the dynamics of your relationship so how can they give you advice? It is healthy and beneficial for you to have wise mentors who you can seek counsel from. However don’t let just anyone speak into your marriage. Especially if they’re not happily married!

7. My husband is a pretty understanding and patient man. Though it is mainly my responsibility to take care of our home, I hold myself to a tougher standard than he does. Lester definitely appreciates coming home to a home cooked meal. But if I text him asking him to bring home dinner he’s fine with that too. He even plays it cool when I do that multiple times a week. He doesn’t complain when dinner isn’t perfect. He is usually grateful and appreciative no matter what.

8. It is important to leave and cleave. We are both blessed to come from a family that we love. Overall, both sets of in-laws love the opposite spouse and treat them with respect. So we had no major problems there. However that did not mean that things were perfect or that there were not any bumps in the road. When those bumps arose, it was very important that we made sure that we were good with each other first. We would not let any issues that outsiders had affect our relationship with each other. This does not mean that you no longer care about your family. However their needs can no longer be a priority over your spouses.

9. Just because you don’t have a “good” day doesn’t make it a “bad” day. When Lester and I were dating we only spent 2 or 3 days together each week. His school schedule and my work schedule didn’t always jive. So when we had time to spend together I always wanted it to be “perfect” If we got into a disagreement or if one of us wasn’t feeling well I would be totally bummed. It felt like a wasted day. But now that we are married we of course are together all the time. If we get home and don’t feel all lovey dovey or extra close it’s fine. Sometimes things get better right before we go to sleep. Sometimes not. But it doesn’t matter. I now have full confidence that we love each other and everything is ok even when it doesn’t necessarily feel that way.

As I reflect on marriage I will leave you with this last thought. Before I was married, I would look at those who were with a little bit of envy. I couldn’t wait for the day that I would get to have my forever person who was always in my corner and cared so much for me. Now that I have it I  think it is pretty wonderful and I plan to do whatever I can to keep it that way. However for those of you who aren’t here yet, don’t be fooled. I know it’s been said repeatedly, marriage is beautiful and wonderful but there are many challenges and sacrifices that go into it as well. Don’t rush into marriage. God-willing, I will never again know what it’s like to be single. There are a few aspects of being single that were easier and I miss them a bit. Would I ever want to go back to that? Absolutely not. But I am also glad that I had a large part of my life that was spent being single and enjoying what that meant for me. You should do the same.

For those of you who are married, what have you learned so far about yourself through marriage? If you are single, what parts of being single do you enjoy now?

Posted in Uncategorized | Tagged , , , , , | 2 Comments

How we Saved Money by having a Co-Op Wedding!

March 9th marks one year of being married. This month, I will have several posts that focus on our marriage and our wedding.

Since my husband and I had a long courting period, our engagement was only about 6 months long. Of that time, we only used about 4 months to plan our wedding. To many people this may sound crazy. But I certainly didn’t want to draw things out any longer. Plus I, like many women, had been getting ideas from Pinterest pretty early in our relationship.

Our lack of time and smaller budget resulted in us enlisting a lot of willing friends and family members to use their skills to make my wedding fantastic! I can truly say that we have a pretty creative and talented group around us! Every element of our wedding included in this post was either donated, gifted, or given to us at a rate well below the regular retail price. I still feel incredibly blessed that we were loved enough to get these great additions to our wedding.

So lets dive in!

Goree Wedding

Goree Wedding

Our venue was the Brand Park Community Center.

Goree WeddingGoree Wedding

Goree Wedding

My sister (Her company is called Dates By Design) was my wedding planner. At first I didn’t want her to do it. Wedding planning can be pretty stressful, and I didn’t want us to fight. Of course we did, but the whole event actually brought us closer. She served double duty as my sister and wedding planner. Her crew did all the decorating, she did our flowers, by bouquet, and she coordinated the event as well. She did both very well. Edited to add, her crew also graciously volunteered their time to help my sister. They spent the whole day before the wedding to make my flower arrangements. then they helped the day off too! Some of them are pictured above. Lisa, Tina, Arlene, Bouvia, Jack and Derek were so kind to do that!

Goree Wedding

Goree Wedding

Our fantastic photographer, the man who took all these great pictures was Keith. Keith is one of my favorite photographers. He has taken so many great candid shots of us. Since our first gem, I asked him to do our wedding. He repeatedly said no, he doesn’t do weddings. But after 1 1/2 years  of wearing him down (literally!) he agreed to do it and at a great rate too. I love how he takes a basic picture and makes it something even more incredible, like the one above.

image1   unnamedGoree's Wedding

Our invitations, menus, and jar labels were made by Lester’s Grandma Linda. Lester did the design, and she printed and made the menus. As a wedding gift, she also made us a beautiful scrapbook. It was really cool because she had all the matching paper, ribbons, and such that went with our theme!


Goree Wedding

Our “guestbook” was actually a giant building blocks set that I made at Home Depot. I will be posting my how-to on this some time this month. But the sanding and stamps on them were done by our friends Steven and Colleen (and her family). They made this beautiful sign too. We didn’t even give them advance notice about this (my biggest pet peeve). When they saw that we needed something done, they jumped at the chance to help out.


Goree Wedding

Goree Wedding

All of this delicious food, some of the desserts, and the appetizers were made by a friend of my mothers. His company is called Delights by Lionel. I still have people raving about the food almost a year later! He definitely gave us a good rate too.

Goree WeddingGoree's Wedding

My hair and make-up was done by Lester’s sister Eulonda. I am pretty fortunate that both of his sisters are professional make-up artists. She made me look and feel so beautiful that day.

Goree Wedding

Goree Wedding

Lester’s brother Jeff sang me down the aisle. He sang one of my favorite songs, Jesus at the Center by Israel Houghton.

Goree Wedding

Since the venue didn’t have dressing rooms, our “Uncle” Kelvin let me use his trailer to get ready in. He is the one in the blue vest telling the guy in the black vest that he is not allowed to go in there. Ha!

Goree WeddingSpeaking of the guy in the black vest, his name is Mike Andre. He is a comedian and he agreed to help our DJ out (the dj was a friend of my sisters.) and he was our MC.

Goree Wedding Goree Wedding

Our friends Amber and Gerald made this funny video of our story to show at the wedding. He is an animator, and she directed all the interview portions. Another friend Asia, let us use her camera and she helped to edit it. Keith let us use his lights for the interview section of the shoot. The video was a huge hit!

Goree Wedding

IMG_3782

Then there’s the cake and the cake pops. Lester has 2 really talented co-workers, Dawn and Greg. They bake cakes for fun, and I’m not talking about your average sheet cakes. They have made minions, the state of Florida with a whirling tornado, and all sorts of incredible things. We were so grateful when they offered to make our cake as well as some cake pops. All we had to do was pay for the materials and that’s it. Knowing that someone loved us enough to make this for us on their free time was HUGE. I thought it was pretty darn nice. Plus it was super yummy! It was a blueberry lemon cake. They were even sweet enough to make us a mini cake to celebrate our first anniversary. This was extra special because we did not take the top of our cake on our wedding day. Now how many bakeries do you know of that would send their client a FREE anniversary cake just because? That’s what I call personalized service.

I really hope that this post serves as an inspiration for you. If you don’t think you have the funds to have a wedding, think outside the box. In the end, we still spent almost twice our original budget. Mind you, the budget was way too low to be realistic. But we were able to incorporate so many fun personal touches that made our wedding ours. Since we had so many people pitch in, it wasn’t just mine and Lester’s. It was ALL of ours!

Posted in Uncategorized | Tagged , , , , , , , , | 7 Comments

Movie Night with Pizza and a Homemade Crispy Wing Recipe

For weeks I have been craving pizza and wings. It seems like every time we got ready to get them something got in the way. Either we were too lazy to go pick it up, or I was too cheap to pay for delivery, or I changed my mind and wanted something else.

On my last Costco trip I decided to get some chicken wings instead of my usual boneless skinless chicken breasts. They also had a 12 pack of Naan bread, which I love to use as a quick pizza crust. I knew that both of these would come in handy soon. I froze all of the naan, and separated half of the chicken wings in the fridge.

One of the most annoying things about ordering pizza is the expense of adding many of your own creative toppings. This is why I love making pizza at home. I can put as many toppings as I want, I usually raid my fridge to try to find new and creative options for my pizza.

So anyway enough of that, on to the recipes.

IMG_3753

Classic pepperoni pizza, Veggie pesto pizza, and Pesto pepperoni pizza

Naan Pizza Recipe

The pizzas are pretty self explanatory.

Spread a layer of your preferred sauce on your pizza. (I used a heaping tablespoon of marinara sauce and pesto)

Cover with cheese (I used Trader Joes Quatro Formaggio mix)

Sprinkle your favorite toppings on top. (I used turkey pepperoni, spinach, red onion, and sun dried tomatoes)

IMG_3752

Boneless honey sriracha wings, Honey sriracha wings, plain wings, Honey bbq wings.

Crispy Baked Chicken Wing Recipe

Ingredients:

12 whole chicken wings separated

Desired Seasonings (I used seasoning salt, pepper, garlic powder, TJs 21 Seasoning salute.) Do not over season.

Olive Oil

Directions:

Preheat oven to 450

Season Chicken

Drizzle about 1 TBS of olive oil on the chicken. You want it to be covered but not totally soaked.

Place chicken on a foil lined baking sheet with skin side up. The chicken pieces should not be touching.

Bake at 450 for 45 minutes.

After that, check chicken every 15 minutes to make sure it doesn’t burn. Once you have reached the desired crispness, remove from oven. (I cooked mine for about 1 1/2 hours)

You can eat them like that or sauce them.

Honey Sriracha Sauce Recipe

Ingredients:

2 TBS of Sriracha

2 TBS of Salted Butter

1 TBS of Low Sodium Soy Sauce

1 1/2 TBS of Raw Honey

Directions:

Add all ingredients to a small sauce pan.

Heat on medium until all the ingredients are melted and combined (about 3 minutes)

Toss cooked chicken wings in the sauce

Enjoy!

What are your favorite wing recipes and flavors? Please share!

Posted in Uncategorized | Tagged , , , , , , , | Leave a comment

How we get rid of Cooties! (My List of natural remedies for colds and flu)

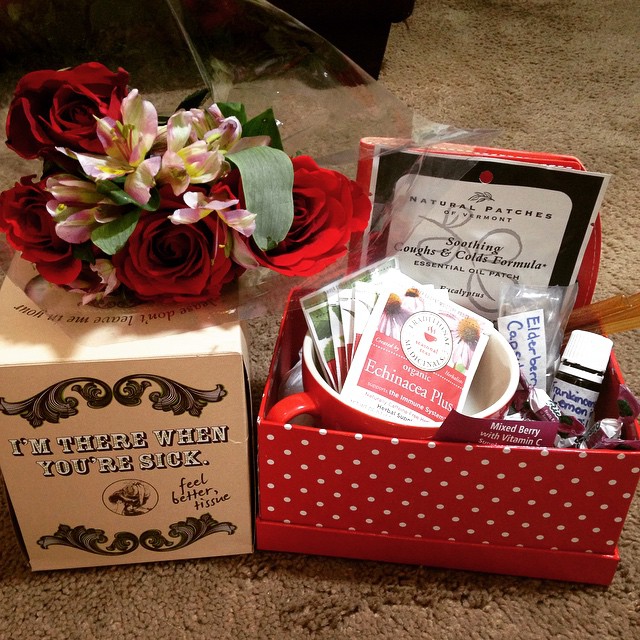
Healthy Care Package

Here’s a natural care package that I made for my mom (in-law). This cute box of tissue is from Trader Joes!

When people see how much of a “germaphobe” I am they usually say, “Well when you do all of that you get sick all the time because you’re body doesn’t have an immunity to anything.” Then I promptly tell them that I work with kids and I rarely run from the germs when I deal with them. So I get plenty of exposure thank you very much! You know what? With all of my cootie dodging I still only get sick 2-3 times a year. Take that!

When I do happen to get sick I try to avoid over-the-counter meds as much as possible. These medicines only help to hide the symptoms but not to heal you. Now don’t get me wrong, there are some times when I have to work or be at an event. In those cases I will take whatever I need to function well. Otherwise I just grin and bear it until I feel well again. So what do I use you might ask? I have an arsenal of natural (and some not as natural) things that I use to speed up the recovery. I think it’s important to actually heal the problem rather that just mask it!

So here’s a list of some of my favorite remedies:

1. Essential Oils- I use these in two ways. I diffuse Thieves, or Lemon around the clock. Thieves is an essential oil blend made by Young Living. You can also use DoTerra’s On Guard or make your own blend. Just google recipes to find one what works for you. (I am not loyal to one essential company. There are certainly differing qualities of oils so do your research and find a quality oil that works best for you.) Thieves and On Guard are great anti-bacterial blends that help to rid the air of germs when diffused. I also use Lemon and Frankincense topically. I will dilute it with jojoba oil and then apply it to my neck and chest. Then I put a heating pad over that. (The same method can be done with a hot wet towel.) I also apply it to the bottom of my feet and down my spine. This helps get the oils throughout my system.

2. Elderberry Syrup or Capsules- I’m sure someone will say the syrup is more effective. I’m not sure. But I have a hard time taking syrups, if they taste funny I gag and I can’t keep them down. I haven’t actually tried the syrup though, so I cannot attest to the taste. However the capsules work just fine for me. Check out the benefits of Elderberry here. Elderberry can be taken as a preventative measure as well.

3. Natural Patches of Vermont (Soothing Coughs and Colds Formula)- These are a staple in our home. We started carrying these at my job. So that is where I get them from, but you can get them online as well. Whenever  we have a bad cough or chest congestion we slap one  of these puppies on and it helps within a day or two. Lester actually had a cough that was bothering him for weeks. I kept forgetting to pick up the patches. When I finally did, he used them and was better in just a couple days! This patch has eucalyptus oil in it, eucalyptus is great for respiratory health. Eucalytpus can also be diffused or used in some humidifiers which will help you breath in into your lungs.

4. Raw, Unfiltered Honey- There are many great benefits for using raw unfiltered honey. Honey has anti-bacterial and anti-microbial properties. It is great for coating and soothing a sore throat. I will add it to my tea or just use it with plain water. It is not beneficial unless it is raw though. Filtered honey is so processed that all the beneficial elements are gone.

5. Teas- I like to get the Seasonal Sampler from Traditional Medicinals. It includes Gypsy Cold Care, Echinacea Plus, Throat Coat, and Breathe Easy teas. I have to admit that I do not like the Throat Coat or Breathe Easy teas from this brand. They are pretty disgusting to me since they taste like black licorice. Yuck! However Lester can handle the taste. So he uses those. Yogi Tea has a Throat Comfort that tastes better to me. Of course I add honey to my teas as well.

6. 100% pure Pineapple Juice- This is said to be as effective as cough syrup. I use this pretty sparingly since it has a lot of sugar in it. I am not a big fan of juice myself, but Lester drinks it.

7. Vitamin C- I have to admit, I don’t always use the “cleanest” methods to get my Vitamin C kick. I am a big EmergenC user and I have also used Airborne in the past. Unfortunately these both have sugar in them. But EmergenC is good since it has Vitamin C as well as other great vitamins. I found out that Vitamin C alone isn’t enough to boost your immune system. Another thing I found out was that protein is needed for a healthy immune system.

8. Minimize sugar intake as much as possible- Sugar suppresses the immune system. Your body will have a hard time fighting off the illness if eat a lot of refined AND unrefined sugars.

9. Thieves Spray or White Vinegar for disinfecting. – A big part of the process is making sure that you get rid of as many germs as you can so illness doesn’t spread to others. Vinegar is great! It’s easy to find, inexpensive, and non-toxic. Yes, the smell isn’t great. But the smell will dissipate, plus it actually helps to remove odors. Clean everything, door knobs, remotes, handles, everything! You should also change your sheets and blankets promptly and disinfect or throw away your toothbrush. You can disinfect it by soaking it in a cup of diluted peroxide. Thieves spray can be used for this purpose as well.

10. Hot Lemon Tea- Whenever I tell my dad that I am sick, he asks me if I’ve had any lemon tea. This cut up lemon boiled in water. If you need it sweetened you can use some raw honey too. This is a great remedy for congestion. It will not “magically” get rid of your phlegm and mucous like OTC meds. But you don’t want that! Those fluids actually hold the infection, this is why it is sometimes other colors. (Sorry if that gave you a gross visual) So you need to cough it up and get it out, and this is great way to do it. Of course it’s not pleasant. But I would much rather have all of that garbage out of my system.

11. REST, REST, REST! When I am not feeling well I make it a priority to rest a lot! I will go to sleep as early as possible. If I am off work for the day I just lay in bed all day. The body NEEDS rest to recover and heal. This is not something that you can be laxed about. Adequate rest will help you get over your sickness much faster.

What are your favorite home remedies, natural cures, and methods that you use to fight off the cooties? Please share!

Posted in Uncategorized | Tagged , , , , , , , , , , , , , , , , , , , , , , , | Leave a comment

Quiche, Sounds fancy but Easy Peasy

When I was younger I remember my mom’s best friend helping to prepare food for a church brunch. One of the things that she was warming up were mini quiche. I asked what they were and she explained it to me. I was hoping to try one right then and there, they smelled so good! But she didn’t have enough to actually give me one. It was a long while before I finally had the opportunity to taste some.

For a while, the only quiche that I ate had been frozen quiche that needed to be reheated. That was good enough for me. I certainly didn’t think that I would have the time or patience to ever make such a fancy sounding dish. I mean it has a french name, I probably needed to go to culinary school or something to be able to make this dish correctly, right? That’s not true at all though. Quiche perfect complete meal all by itself and it works well for any meal in the day! This dish is easy to make and it doesn’t take a whole bunch of strange ingredients either. In fact you can use just about any meat or veggie that you have in your fridge. Any old cheese will work too. Well maybe not old cheese. You know what I mean.

Ingredients:

Frozen pie crust (If you’re feeling adventurous you can certainly make your own.) I got mine from Sprouts. I didn’t want a lot of extra ingredients in it.

5 large Eggs

6 slices of crumbled cooked (turkey) bacon (or chopped up ham or turkey, or whatever tickles your fancy)

2 cups of low fat cheese, grated (I used cheddar and mozarella)

1 bag of spinach cooked until wilted

1/2 of onion chopped and cooked (optional)

2/3 a cup of lowfat milk

Directions

Cook spinach and onions until they are soft but not mushy. Cook bacon until it’s crispy. Set both aside and allow them to cool. Grate your cheese and set it aside. Take your pie crust from the freezer. No need to defrost the crust.

IMG_1195

Layer the cooked spinach and onions on the bottom of your quiche. Then layer the meat on top of that.

IMG_1197

Whisk your eggs and milk together. Then pour the mixture over your meat and spinach in the crust. I had a little bit left over. If you do to, feel free to use it for some scrambled eggs.

IMG_1198

Top the quiche with the cheese. Bake covered at 350 for 20 minutes. Then uncover and bake for an additional 10 minutes until the quiche is a nice golden brown.

IMG_1200

This quiche came out pretty darn well. The recipe that I followed said to layer it as I said above. But I don’t like biting into it and tasting each layer separately. I made another quiche on another day. This time I mixed the meat, spinach, and half of the cheese in a bowl then put it in the frozen pie crust. Then I poured the egg mixture over that and topped it with the remaining cheese.

From start to finish you should be able to have this done in an hour tops. Not to bad huh? What are your favorite filling ingredients when you make quiche

Posted in Uncategorized | Tagged , , , , , , , , , , , , , , | 1 Comment

My BBQ Chicky Mac Recipe

If you are a homemaker whose family has roots in the south, you better know how to make some darn good baked macaroni and cheese! Well I have tried and tried and I have yet to make a macaroni and cheese that would make my grandma proud. I have made some good ones, but certainly nothing to write home about it.

Well ya’ll I finally did it. I found a recipe that I was able to master and even personalize it some too! The winning recipe was actually singer John Legend’s recipe! Now I have to admit that some of the problem with my previous attempts with mac and cheese stemmed from the fact that I tried to make a “healthier” version. Part of my goal when cooking is to make the things that we enjoy a little less naughty. So I would use whole wheat pasta, low fat cheeses, low fat milk, and no eggs or butter. I read recipes that said you need to use the full fat stuff to make it good. But I didn’t believe them. Well…I think they may have been right my friends.

I still used whole wheat pasta. I actually found some whole wheat pasta that is shaped like Cavatappi which is my favorite pasta shape at Sprouts. But I personally don’t feel like this was a big “sacrifice” taste wise, to me whole wheat pasta doesn’t taste worse than white. I also usually prefer low fat cheese (I try to stay away from full fat dairy products). It tastes just as good to me as the full fat versions. However at Trader Joe’s they have very few low fat block cheeses. I’ve been trying to use whole blocks of cheese lately. Even though it is more work, it has less added ingredients added to it to keep it fresh. However I still used low fat half and half for the recipe.

Anyway let’s get to to recipe shall we? Keep in mind, I definitely strayed away from the original recipe in more ways than one. This was a last minute decision to make this macaroni and cheese. So I had to make whatever we had in the house work. So here it goes.

Ingredients:

Macaroni and Cheese

3 cups of cooked pasta (cook it a little under al dente so it doesn’t over cook while being baked)

2 cups of grated sharp cheddar cheese

1 cup of a parmesan/mozarella cheese mix

1 pint of low fat half and half

1/2 stick of butter

2 eggs

1/2 teaspoon each of seasoning salt, garlic powder, and pepper

Barbecue Chicken

2 large chicken breasts

1 cup of barbecue sauce

Seasonings to taste

4 cooked strips of bacon (I used Turkey bacon)

Directions:

Cook your pasta then melt half a stick of butter in the hot pasta. Make sure that all the pasta is covered with butter.

In a separate bowl, whisk eggs and half and half. Mix in seasonings after.

Mix your grated cheese in another bowl.

Layer your pasta and cheese in a greased baking pan. Start with the pasta, then cheese repeat for 3 layers. The top layer should be cheese. Then you can pour your half and half mixture over the layered pasta. Bake at 350 for 30 minutes or until the cheese is melted and bubbly.

You can cook your bacon in the oven while all of this is happening. Crumble your bacon or (cut it up if you use turkey bacon like me).

While you are cooking your pasta, bake your seasoned chicken for 20 min at 350 covered. When the chicken is cooked through, uncover the chicken and brush some barbecue sauce on both sides then cook for an additional 5-10 minutes uncovered. Make sure it doesn’t dry out. When the bbq sauce has been baked into the chicken take it out of the oven. Then cut it up in to smaller pieces and toss it with the rest of the bbq sauce.

The macaroni and cheese.

                                                                 The macaroni and cheese.

Once everything is done it is time to put it all together! You can put your crumbled bacon on top of the cooked macaroni and cheese like so.

Here's the turkey bacon on top of the macaroni and cheese.

                                   Here’s the turkey bacon on top of the macaroni and cheese.

Then you will add the bbq chicken to the top of that.

IMG_1919

                                                    Oh my sweet mercy, doesn’t this look good!

Can I just tell you that me and the hubbs were loving this stuff! The bacon flavor wasn’t very strong. So if you chose to omit that I don’t think you would miss anything. Also it might be more flavorful with pork bacon. I’m not sure. I used a bbq sauce that was kind of sweet. Next time I would either use less or find one that isn’t as sweet. Other than that, it was perfect. Oh and to give it a little kick you can squirt some siracha on the top, I did that and it was even better!

Try it out and let me know what you think. Also please let me know of some fun variations that you may have for Macaroni and cheese!

Posted in Uncategorized | Tagged , , , , , , , , , , , , , , , , , , , | Leave a comment