My Birthing Center Experience

My son is asleep. Did you hear me? My 6 week old son went to sleep, without a big fight, and this is his second nap of the day. His second nap, might I add after sleeping relatively well last night. Relatively because ya’ll know newborns have their own standards when it comes to sleep. But this mama is happy! This also explains why it has taken 6 weeks for me to share my experience during his birth.

You may have read my post on why I wanted a natural birth. I know I was supposed to do a couple follow up posts. But to be quite honest, I was SUPER tired at the end of my pregnancy. So I didn’t get much done beyond what was absolutely necessary. (Like making a ton of freezer meals which came in really handy!) My apologies for that, but I will explain a bit of my reasoning in this post.

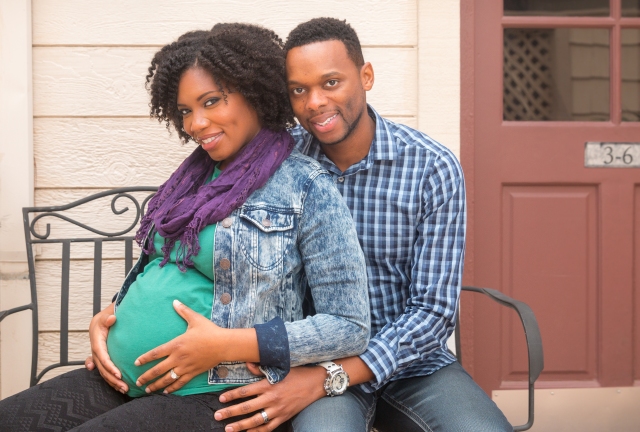
Unfortunately, and fortunately my son was “overdue”. I say fortunately because this gave my husband and I a little more time as a twosome. Now anyone who has done their research knows that the average first time mom delivers her baby at 41-41.5 weeks. Technically baby boy was still on time. But he was not on my schedule!

When I was at 40 weeks and 4 days, I started having prodromal labor. At night I would have real contractions, sometimes they would be close together. I would think, “ok in the morning they will get even closer and I will go into active labor.” Then when I woke up, they had pretty much stopped. This went on for 3 days. By day 3 I called my midwife, I was discouraged and tired. She said I could go in to see her, but there probably wouldn’t be much that she could do if I wasn’t in active labor. So I decided to hold out.

By the 4th night of prodromal labor I was done. This time my contractions were consistently 10 minutes or less apart. I wasn’t able to get any sleep, (on the previous nights, I slept fairly well.) so I knew there was something different. I called my midwife at around 12 am. She told me she would meet me at the Birthing Center at 2 am to assess the situation a little better. I gave birth at the Natural Birth and Women’s Center.

FullSizeRender

This is the waiting room at the center.

Once we got there, she checked my dilation and effacement. Fortunately my prodromal labor had bore fruit. However I still had a ways to go. She decided that I should stay there so that I could get some help with the process. I was very grateful for that since I would normally have to wait until things had progressed more. I REALLY needed Claudia’s help because I was having a very hard time relaxing through the contractions. Whenever I relaxed, they were much more bearable and they went by more quickly. She helped to keep me on the right path.

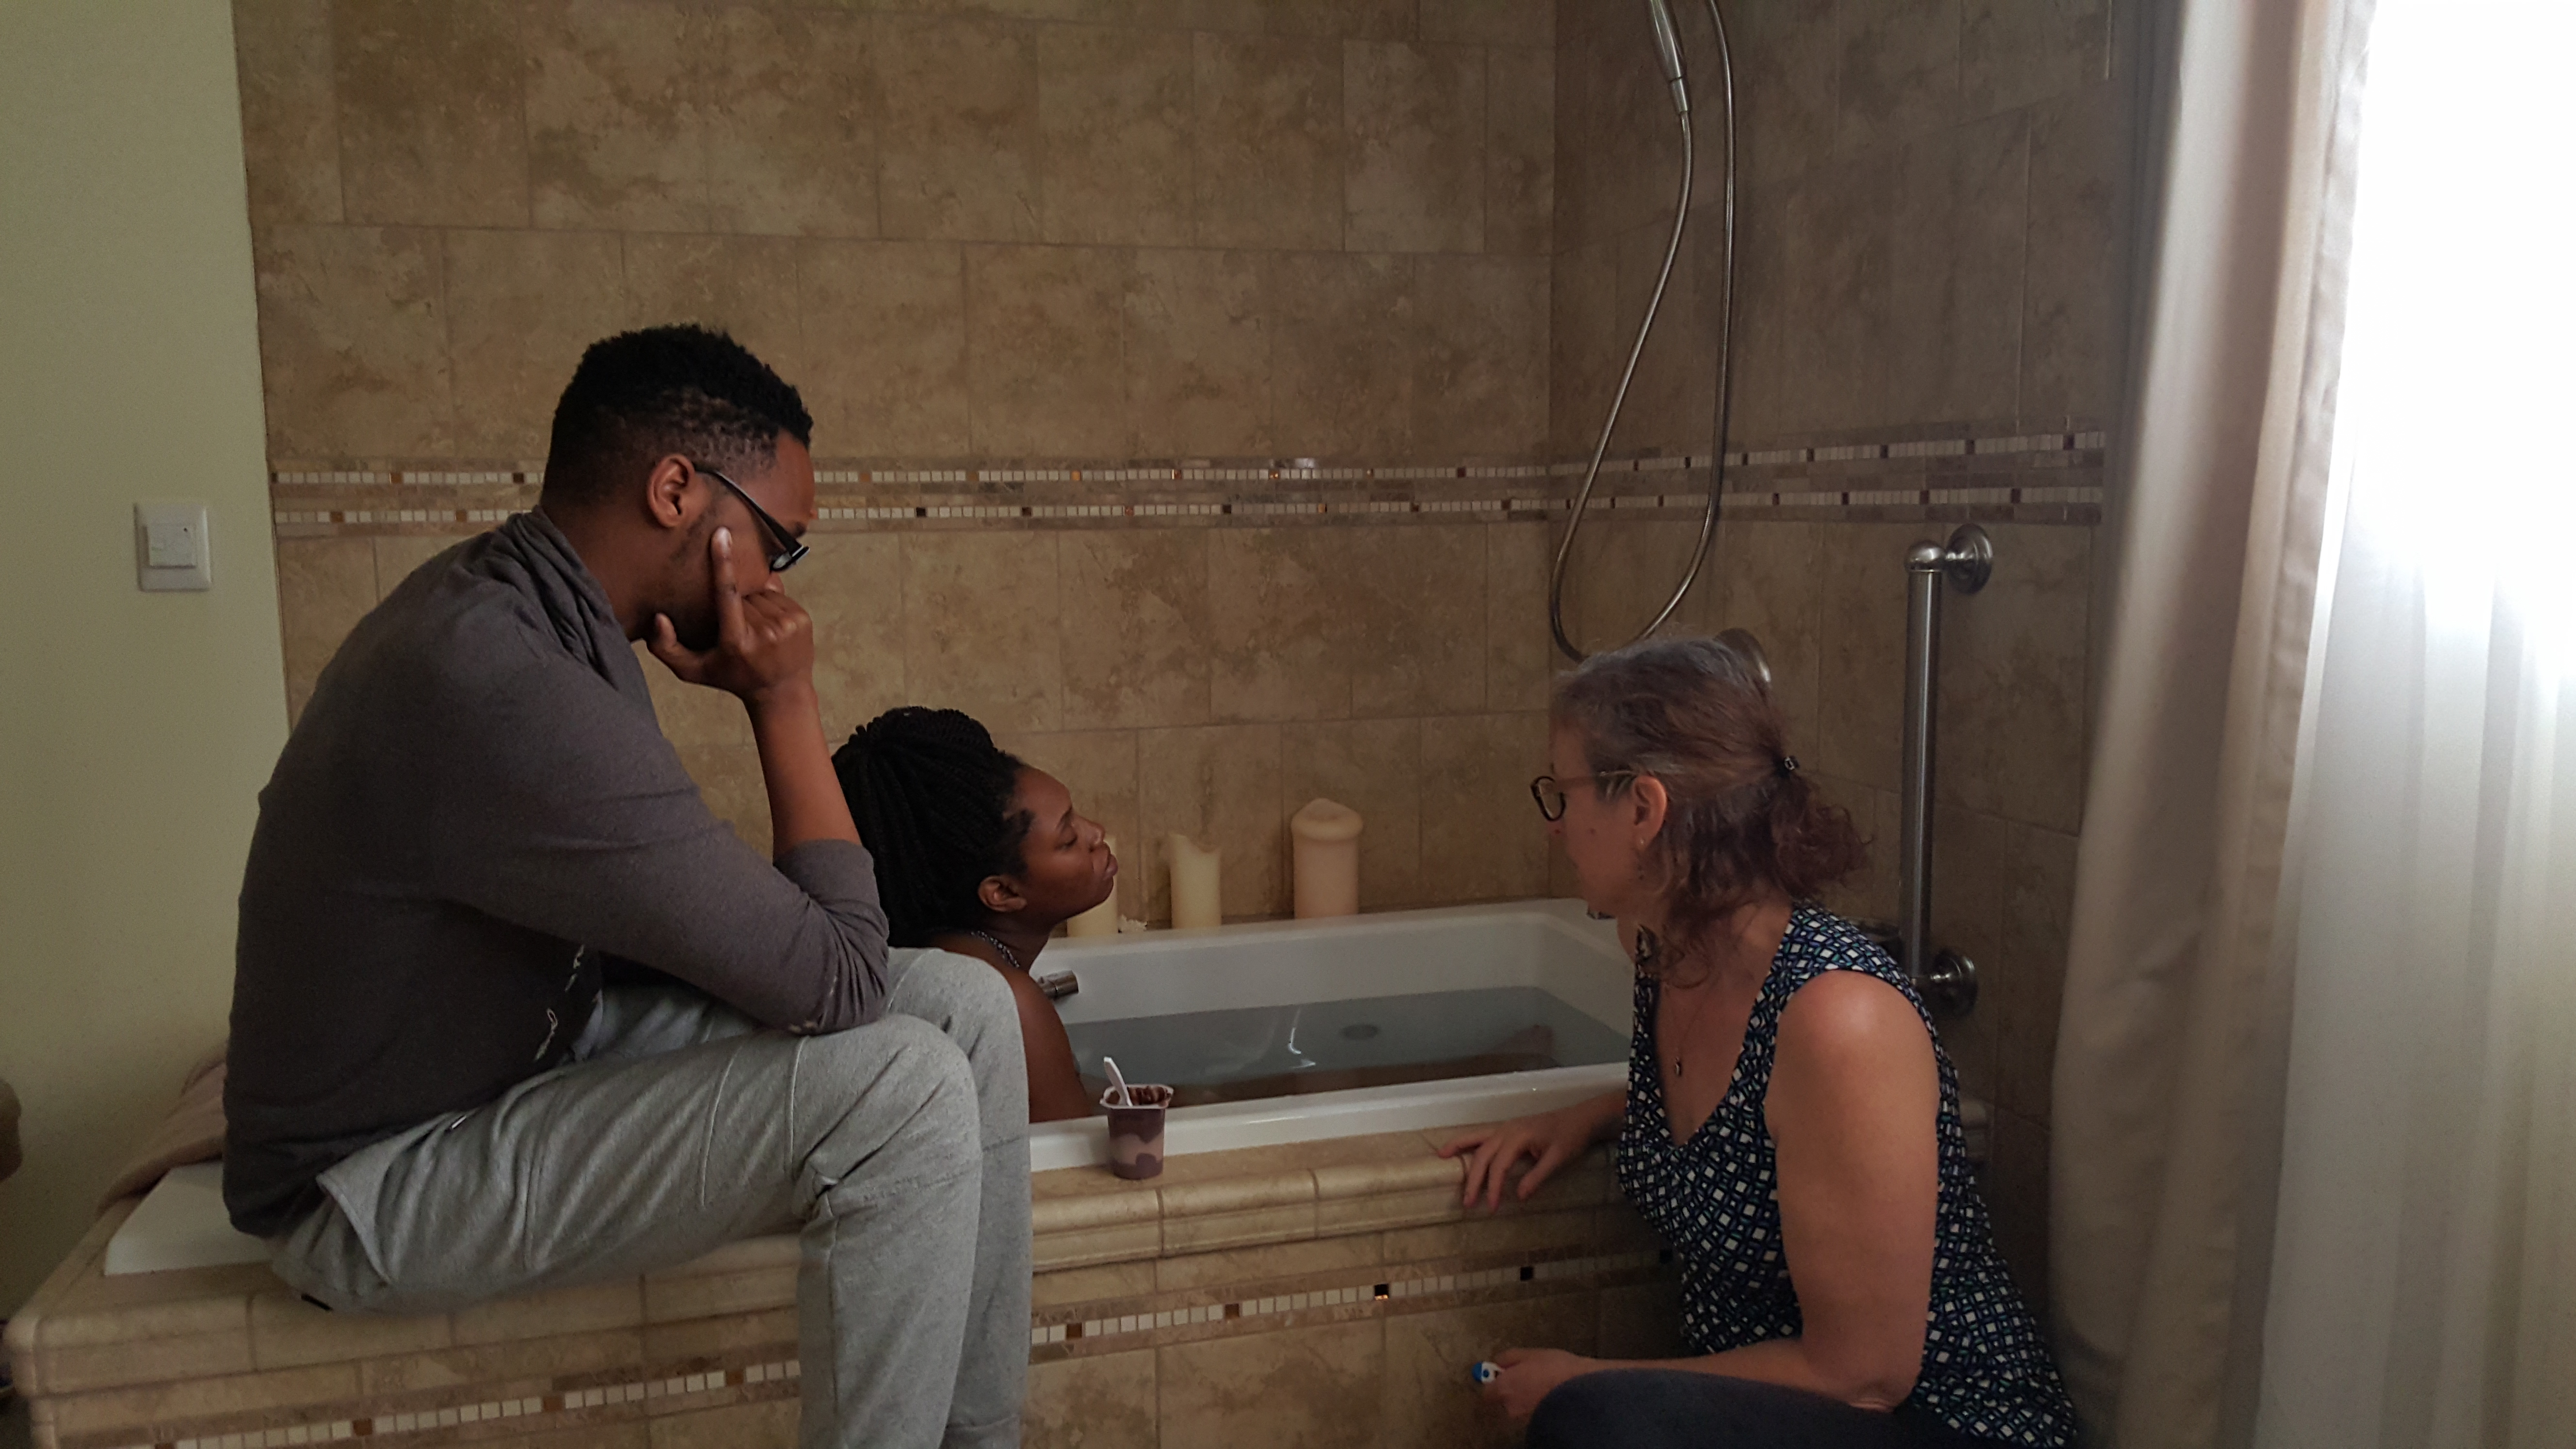
The cool thing about the birthing center is we were in a room very similar to a room you would find in a home. There is a big tub for water births. I had no intention on having a water birth. It just sounded icky to the germaphobe side of me. But I wanted to labor in the water. I heard that the water sometimes helps with contractions as well as with preventing or minimizing tearing. So I got in the water shortly after arriving. When  it didn’t help with the contractions, I decided to get out and get in the bed where I thought I would be more comfortable.

FullSizeRender 2

This is the room where I gave birth.

I had a queen sized bed, so Lester was able to lie down with me in it for comfort. At this point, there wasn’t much that could be done for me. So I told my midwife that she could go in the other room to take care of things. I told Lester to lie down too so he could rest up for when things got real. Neither of us had slept since the morning before. I got in the bed as well. When contractions would come, I got up and powered through them, doing my best to relax. Then I would get back in the bed and take a nap. I ended up “going it alone” for about 2-3 hours. (I know that there are some massage techniques that help with labor. But I really just wanted to be left alone at that point.) Time really went by quickly though thanks to the naps that I had in between.

After a while, Claudia came back in and told me she had called the student midwife Johanna to come in and help. I went another hour or so with contractions on dry land. Then I decided to try the water again. I didn’t think the water would help with contractions, but I still wanted to uh…well soften things up in my lady parts in hopes of preventing tearing. Plus, the water was very soothing and relaxing between contractions.

I had another hour or so (honestly I don’t know why I’m giving time frames, I have no idea how long each step actually took.) of contractions in the water before I began to feel the urge to push. They asked if I wanted to get out of the water. Now mind you, ever since I can remember I planned to deliver either squatting or on my hands and knees on dry land. I knew that these were the “best” positions to give birth in since squatting uses gravity to help and the  hands and knees position really opens up the pelvis. But at the point I didn’t want to be cold and have to dry off when I got out of the water. So I just stayed in there.

IMG_2311

Claudia said chocolate pudding gives a mama energy to push. I hate chocolate pudding but I would do anything to make the process go quicker. I was only able to eat one bite.

Oh I forgot to mention that my bag of waters hadn’t broke yet, and thankfully my midwives had no intentions of breaking it! I know breaking the water bag is supposed to speed things up. But this can cause a fast spike in the pain of contractions, plus it increases the risk of infection. It’s totally unnecessary to deliver your baby, things were just left as is. After pushing for a while, I looked down and I could see the bag of waters emerge first. My baby was almost here! I pushed again, and I got a peek at his head. He had a head full of hair! Some people are afraid of the “Ring of Fire”, I sure was. Even though it DID hurt to push his head through, it wasn’t that bad. It definitely didn’t help that the boy had his little tiny fist by his cheek when he emerged. I believe this is why I had the prodromal labor. My son LOVES to keep his hand by his head to this day. So this created a greater surface to push down and out! At least not in comparison to the discomfort of contractions. Plus I was prepared for it, and I knew that sensation meant that my son was almost here! (Like I said I was prepared to feel that. I think if I had an epidural and didn’t plan to feel anything, that would have freaked me out!)

After about an hour and a half of pushing, he was here! When he came out he did not cry at all. He made a few little noises and he moved his head to look around a bit. But he was totally calm. Claudia got ready to suction his mouth, then he turned his head around and spit the fluid out of his mouth on his own. He was not born completely en caul (or in the sack). When his head came out, the bag broke. I still think that it was pretty cool that my baby was born in water, in water.

After that I got out of the tub and the checked to make sure everything was good. My son’s umbilical cord was still attached to the placenta which I hadn’t birthed yet. Once I did, they tucked the placenta into a little package next to me while I held him. We did delayed cord clamping, so it was probably 30 minutes or so before his umbilical cord was cut. Everything was done at such a relaxed and calm pace. His weight, length, and apgar score was taken maybe an hour after he was delivered. This gave me and Lester some time just to bond with our little guy. We stayed at the center for about 4 hours after Calvin was born. Then we went home. Before I had him, I was freaked out about having to leave so soon after he was born. But I was really glad to get home and in my familiar place rather than staying somewhere over night. My midwife came to my house the next day to check on me and the baby. I had some additional questions about a couple days later and she came back again to work with us.

IMG_0214 2

Claudia checking his vitals.

IMG_0219 2

Baby Boy getting weighed.

Would I do it all the same way again? Yes, almost completely the same way. I say almost because I would have been better about doing either the Hypnobirthing or Hypnobabies study. I truly believe that if I had followed through on one of those it would have taken the edge off of the contractions. Even though the contractions were VERY uncomfortable. I would still choose to have my baby without medication. Mind you, if I had been in a hospital I’m sure I would have convinced myself that I needed some pain medication. But I didn’t. That was the perk of doing it at a birthing center. I didn’t have the option. I would even do the water birth again IF that was what felt right at the moment. Since I was at the birthing center, I had options. I was able to follow the cues of my body, and that was really important to me.

Giving birth in this manner made me feel like a BOSS! I am so proud of myself and so happy that I was able to do it. As long as I can remember, I have always wanted to give birth without medication. Many people told me that birth is harder than I could imagine, and I wouldn’t be able to do it. I certainly doubted myself throughout the process. But I just tapped into the She-Woman that is deep down inside of me and I did it! Please understand that I fully believe that ANY woman who gives birth should have the same level of pride in herself no matter if she had a c-section, a water birth, a still birth, a barn birth, or birth in a car! Creating a human and bringing it forth is an AMAZING thing no matter how it happens. I am just grateful that I was able to of

Well that’s my story in a nutshell. I’m sure that I am forgetting to mention something. So if you have any questions about the process, ask away!


Posted in Uncategorized | Tagged , , , , , , , , , , , , , , | Leave a comment

Postpartum Freezer Meal Prep Ideas

So here I am, 1 day shy of 39 weeks pregnant and my delicious little boy is still chilling in my belly. I didn’t officially start maternity leave until I was 38 weeks. So i’m super grateful that he held on until now. That gave me the opportunity to get EVERYTHING done! I mean everything is set and ready for whenever my son makes his appearance. I have a few little projects to do to keep me busy until he arrives. But it’s all more busy work than anything else.

One of the big things that I wanted to get done was meal prep with freezer meals.  Honestly the idea of shopping for a ton of food and spending a ton of time in the kitchen prepping multiple meals did NOT sound appealing to my tired feet and back. But I knew that we would really appreciate having a full freezer once Baby G is here.

I looked on Pinterest for ideas. It seems like freezer meals mostly fall into two categories. slow cooker meals or casseroles. I do enjoy the ease of using a slow cooker. But I don’t like that I would have to plan ahead to make sure that they were cooked by the time I needed them. Also some of those meals required me to add something to the meal after it was done in the slow cooker. I wanted something that would be easy for my husband to throw together. So I chose to lean more towards casserole type dishes.

Anyway let’s get into the meals!

I took a little drive around Costco. Oh yeah, I totally used one of those motorized scooters to maneuver through the aisles. Hey I had 3 stores to go to, and a whole afternoon of cooking ahead of me. So I had to preserve these legs! I decided that I would make 5 different things: Baked Ziti, Chicken Pot Pie, Chicken Enchilada Casserole, Chicken Burritos, and Quiche. To make things easier on myself, I got as many pre-made items as possible. For example I bought 3 rotisserie chickens, frozen pie crusts, and cheese slices. I’m sure that for some of the things, making them myself would have been cheaper. But saving time was more important to me. Plus I will save money in the long run when we are not eating out as much once the baby is here. So it will balance out.

Here is my Freezer Meal shopping list.

Costco

  • 3 Rotisserie Chickens (I really only needed 2 for the meal prep. But I used one of the other ones for dinner the next day)
  • Organic Spinach
  • Ground Chicken
  • 1 package of Tillamook Mild Cheddar Cheese Slices
IMG_0089

These chickens are just as cost-effective as making your own with half the work! Plus they have no added hormones or steroids. I froze what was left over to use for other meals.

Smart and Final

  • Metal Tins for packing meals


IMG_0088

These were around 10 for $6. The size is perfect for 2 people. Plus I like that they have the sturdy lid for stacking.

Trader Joes

  • 1 package Whole Wheat Pasta
  • Half a dozen Organic Eggs
  • 1 pint Half and Half
  • 1 package Frozen Mixed Vegetables
  • Whole Wheat Flour
  • 2 cans of Marinara Sauce
  • 2 packages of frozen Pie Crust
  • 1 package of Mozzarella cheese
IMG_0090

Apparently these are seasonal at TJs. So I was lucky that they still had some left over. I like that I can make them into whatever shape I need unlike the ones that are already in the pie pan.

Things I already had on hand

  • Mild Enchilada Sauce
  • Turkey Bacon
  • Seasonings

(Of course, I purchased a lot more at all of these stores. But this is what I bought for the meals that I made.)

Here are the Recipes:

IMG_0105

I made a list in order to keep my self from forgetting the plan (preggo brain is real!) and also to encourage me as I got meals done.


CHICKEN BEAN AND CHEESE BURRITOS

IMG_0096

Ingredients:

  • 10 Flour Tortillas
  • Shredded Rotisserie Chicken
  • Can of Refried Beans
  • 5 cheese slices cut in half

Layer 10 pieces of foil on top of each other. (Make sure they are big enough to wrap the burritos. Then put a little beans, a handful of chicken, and half a slice of cheese in the tortillas. Wrap the burrito up, wrap with foil and you’re done. Lester likes to take these for work. They can be popped in the microwave (without the foil of course) or oven. I would suggest letting them thaw overnight in the fridge to warm up more quickly.

IMG_0133

BAKED ZITI WITH GROUND TURKEY AND SPINACH

Ingredients:

  • 1 package of Ground Turkey
  • 1 Package of Whole Wheat Pasta
  • 2 big handfuls of spinach
  • 2 28 oz Cans of Low Fat Marinara Sauce
  • Low Fat Mozzarella
IMG_0093

I cook my pasta in a skillet to save water and time.

Brown turkey in a pan. Add marinara sauce once cooked. Season to taste. (I added some salt, dried basil, and garlic powder). In another skillet (yep you can cook pasta in a skillet. It uses less water and cooks more quickly too!) cook your pasta. Combine everything adding the 1/2 a package of mozzarella cubed. (You can of course use shredded mozzarella too) Top with some thin slices of mozzarella and you’re done!

IMG_0094

TURKEY BACON and SPINACH QUICHE

IMG_0104

Ingredients:

  • 6 large Organic Eggs
  • 5 slices of Cheddar Cheese cut up into little pieces
  • 8 slices of Turkey Bacon
  • 2 big handfuls of Spinach
  • 2 Pie Crusts

I have posted this recipe before, so here are the directions. I added the ingredients above because this is for 2 smaller quiche rather than one that was slightly bigger. I fully cooked the quiche. Feel free to play around with the types of cheese and meat that you use.

CHICKEN ENCHILADA CASSEROLE

Ingredients:

  • 6-8 corn tortillas
  • Shredded Rotisserie Chicken
  • 6 slices of Cheddar Cheese
  • 1 can of Enchilada Sauce

IMG_0092

Spread a thin layer of enchilada sauce on the bottom of the pan. Put tortillas on that layer (break tortillas to fit the pan). Add a layer of cheese, then a layer or chicken. Spread some sauce on top of that. Repeat until you get to the top of the pan. The top layer should just be sauce then cheese.

CHICKEN POT PIE

This is the first time that I made this recipe. I haven’t had a chance to eat it myself since the meals have been frozen. The filling inside tasted amazing! But since I haven’t eaten it all together, I will share the recipe that I based my version on.

Chicken Pot Pie Freezer Meal Recipe

For my version, I basically just made a thick gravy using chicken broth, whole wheat flour, and half and half. Then I seasoned it a bit to taste. I added rotisserie chicken and a frozen veggie mix to finish it off.

IMG_0098

IMG_0099

Since I only had 2 pie crusts, I couldn’t completely cover the pie. I think it should be fine though.

The pot pie should be cooked for 30 minutes uncovered, 30 minutes covered in foil, and then another 20-30 minutes to brown the crust.

Here’s the finished product!

IMG_0100

As you can see, I added the date and cooking instructions to the lids of each meal. This will make it easy for whoever happens to be cooking them to get them ready. For most, you will just cook at 350 or 375 degrees for 30-45 minutes. I would NOT use the lids that come with them while cooking them since they are made of paper. Covering with foil before cooking is probably the best choice.


Posted in Uncategorized | Tagged , , , , , , , | 2 Comments

My at Home Maternity Photo Shoot

When I thought about getting pregnant I had so many plans on what I would do during my pregnancy. Being a Pinterest junkie I fully planned to use a lot of the cute ideas that I’ve pinned and making them my own. Then I actually got pregnant, and I felt like one feels when they get pregnant. Yeah, a lot of that went out the window. Honestly this pregnancy has turned me from a Type A super planner, to a girl who is just trying to get through! My husband loves it. 😉

However one thing that I knew I wanted, was maternity photos. I knew that if I didn’t take them, I would regret it. Being pregnant is such a special part of life. If God blesses me to do it again, (and honestly if I’m up to do it again), then that would be great. Just in case, I really wanted to make sure to document this wonderful time in our lives.

We have a great friend named Keith who happens to be a professional photographer. He’s done our wedding photos, my headshots which turned into our engagement shoot. (Yes my clever husband proposed when I was getting headshots taken so that the proposal was captured too). We really LOVE his style of photography. (He always over delivers whenever we shoot with him. Check out his site, you won’t be disappointed.)

In addition to that, I am very fortunate that both of my sister-in-laws are professional make-up artists. Lester’s sister Eulonda did my hair and make-up for my wedding. For my maternity photos, Michelle was nice enough to hook me up with a great natural look.

As far as locations go, I originally had the plan to go to this new outdoor mall that is near us. The mall has so many colorful and lively spots where great pictures can be taken. But when the day approached, I wasn’t feeling well at all. So all I wanted to do was get these pictures done before my baby shower. So even though we originally were going to do just a few pictures at our house, we decided to stage the whole shoot there. Mind you we just moved in about a month ago, and our condo is still a work in progress since we are focusing on getting what the baby needs first. But we were able to make our humble abode work for the shoot, and I am really proud of the results.

So enough talk about it, let’s get to the photos!

Goree Baby Bump-1Goree Baby Bump-2Goree Baby Bump-6Goree Baby Bump-10Goree Baby Bump-14Goree Baby Bump-19Goree Baby Bump-25Goree Baby Bump-28Goree Baby Bump-24Goree Baby Bump-21Goree Baby Bump-30Goree Baby Bump-35

Have you taken maternity photos, and if so what inspired your photo shoot?

Posted in Parenthood | Tagged , , , , , , , , , | 4 Comments

Why I’m Aiming for a Natural Birth

fontcandy

Whenever I tell people that my plan is to have my baby at a Birthing Center with a Midwife I get one of two reactions. For some people they are excited and supportive. Many people say that they thought about that option as well or would have done it had circumstances been different for them. On the other hand, there are those who tell me I’m crazy to want to have a baby without meds. Or they say that it is not safe for me to do so. I’m always polite, and I smile and listen to their thoughts and opinions. But then I reassure them that I have researched this and that I am very confident in my decision. I have no intention to change my mind.

Since I don’t have time for a drawn out discussion when these conversations arise, I do not share that research. This is what brings me to this series of blog posts. I want to take some time to share with you why I chose this method for bringing my child into the world. My intentions for sharing this are NOT to dissuade anyone else from a hospital birth, a medicated birth, or a necessary C-section and it is NOT to try to put anyone down who intends to have one. All I want to do is share how I reached this decision. I also want to share some of my research so that more women know their rights. I want women to know that there is more than one path and more than one option when it comes to giving birth.

WHAT INITIALLY PUSHED ME TOWARDS NATURAL BIRTH

If you have read some of my previous blog posts, you know that I lean towards the more natural side of things when possible. This is how it’s always been for me. Through the years, when I thought of giving birth, I NEVER wanted an epidural. My main reasoning for this is that my sister had to have 2 c-sections  and she has had back pain in the injection site after having her babies. Then as I got older I heard multiple stories of women who had epidurals and they didn’t work, worked partially, or wore off before the baby was born. Why would I want to take the risk of having a needle stuck in my spine in the hopes of alleviating pain when it might not work! Why would I do something to stop pain for a few hours that could cause pain for a life time? No thanks. My mom had me without any medicine, so I already felt as though it was something I could accomplish. Now that I think about it, this is probably another big contributor for wanting to birth without medication. Though she did not have an easy or pain-free birth with me, she made it sound so much more pleasant than her first birth.

I AM NOT TRYING TO WIN A PRIZE, EARN COOL POINTS, OR ANYTHING LIKE THAT!

I remember telling a group of ladies what my intentions were for my birth. Mind you, I don’t run around saying, “look at me look at me, I’m going to birth in a Birthing Center!” For some reason, one of the first questions that you are asked when people find out you’re pregnant is, “Where are you delivering and/or who’s your OBGYN?” (Of course that follows, “When are you due and what are you having?”) Anywho these ladies immediately started to say things like, “Well you don’t get a special prize for doing it without medication.” I wasn’t particularly close to this group of ladies. So I held my tongue. But I wanted to tell them (in a not so nice way!) that that was not my purpose in doing it.

Let me make this point very clear. I am NOT trying to prove what a strong woman I am. I am NOT trying to see if my body can rise to a higher “astral level” or whatever hippie sounding stuff you may feel is associated with giving birth naturally. For some women, that is their motivation and that’s cool. For me, I simply want to let my body do what it was made to do by God. I believe that he created women (and female animals) to be able to give birth with minimal pain and discomfort in normal, low risk circumstances. Many, many, MANY women give birth outside of hospitals all over the world and they do just fine. Will that be everyone’s experience? Nope. Will that be my experience? Hopefully, but I know that if it’s not, that’s ok too. I trust my body and I trust that my body will know what to do when it is time for me to give birth to my baby. I cannot let my body do it’s own thing if I am constantly pumping different medications into it. More on that in my post on Why I am birthing in a birthing center and not a hospital.

Remember, just as one can “plan for the worst”, they can also “plan for the best”. I’m choosing to do the latter with the knowledge and acceptance of what can happen if thing do not go as planned.

THE BUSINESS OF BEING BORN

I eventually heard about the documentary, The Business of Being Born. (You can find it on Netflix or Youtube.) I watched this before I was actually pregnant, which I think is the best way to go. That way you have time to do research and you don’t have to feel like a decision needs to be made quickly. If you ever plan to give birth, PLEASE check this movie out.  This movie really helped to introduce a few things to me. Mind you, it is from one perspective, and of course it is biased in some ways. I couldn’t help but think that some things were presented in a propagandized fashion. Still, some of the concepts presented in this documentary are undeniably scary. I suggest that you watch it to just as a starting point. This will no doubt reveal some questions that you should ask yourself as well as questions that you should ask your doctor and hospital. After that, you can begin to read and do research of your own to find what rings true for you and your situation. In my opinion this will help you form the best plan for yourself rather than trusting others to do it for you.

 SOME OF MY RESEARCH

I looked up videos on Youtube, I read books, I have also read articles on the internet to help me form my decisions for my birth. The information provides different perspectives on natural births and births outside of a hospital. In an effort to help you along the way, I am sharing some of  my favorites below.

The Business of Being Born on Youtube

US has Highest Maternal Death Rate among Developed Countries

Science Based Medicine Article on The Business of Being Born

My Natural Childbirth Youtube Playlist

Ina May’s Guide to Childbirth 

For more insight on my journey to my Birth Decisions, please stay tuned for the next two posts on Why I Chose a Midwife and Why I chose a Birthing Center.


Posted in Uncategorized | Tagged , , , , , , , , , , , , , , , , | 2 Comments

A Delicious and EASY Kale and Ground Turkey Taco Recipe

IMG_3541

Man oh man, it’s been a LOOONG time since I’ve done one of these. I’m feeling really excited and accomplished today! For those of you who don’t know yet, I’m PREGNANT! I am 16 weeks pregnant as of yesterday and I am finally feeling more like myself. Let me teeeeeelllll you that my first 14 weeks of pregnancy were the realest. I anticipated some struggles, but I had no idea that it would be that bad for me. I am not going to go into all the details in the post. If you’re curious, let me know if you want a more detailed report of my first trimester and I will do a post just for that.

I am celebrating because I was actually able to get some chores done at home AND I actually cooked a meal too. You would not believe how much eating out we’ve done over the last few months. Yesterday I got up at 6 a.m. I did the laundry, it’s so nice to get there when there’s no one around. Then I picked up a few groceries, made myself some breakfast, I put the clean sheets on the bed, and put all the laundry away. All of that was done by 10 a.m. Lately I haven’t even been able to get out of the bed and get some water by 10 a.m. This was a great accomplishment for me!

Of course, I have had to adjust things a little bit. I can’t move as fast, stand as long, or run around as much as I used to. But I am really blessed to only work 2-4 days a week right now. (Thank you God and thank you husband!) So I don’t need to rush around to get everything done anyway. I don’t know how long this will last, but I am going to ride the wave as long as I can.

On to the recipe. Since I have been nauseated most of the time, I have been pretty picky with my eating. I have had this nasty taste in my mouth which resulted in my living off…well let’s just say not so healthy foods. When I went to the store today, I was determined to pick up some veggies to begin to incorporate them back in my life. In the organic produce section there was some fresh looking Kale. I grabbed that, not knowing how I would use it. On my way home, I realized that I intended to make tacos for dinner. But I hadn’t picked up any spinach which is what I usually use for our tacos instead of lettuce. Then a light bulb went on, I decided to use the kale for the tacos.

Don’t get me wrong, I am not a big kale fan at all. Depending on how it’s prepared, it can be a little too bitter for my taste. But I am determined to have a more love/love relationship with it. This recipe is certainly a step in the right direction, plus it’s super EASY! Let’s get to it.

IMG_3532

INGREDIENTS:

1 package of Ground Turkey (or any ground meat)

1 can of tomato sauce

1 package of Taco Seasoning (I prefer TJs, but their version is “spicy” and it’s too hot for the Mr. One day I will be cool and make my own.)

1-2 cups of Kale chopped up

Corn or Flour Tortillas

Olive Oil

Toppings:

Shredded cheese of choice

Salsa

0% Greek Yogurt (Greek yogurt is a great source of protein and it’s a healthier sour cream substitute.)

Whatever else helps you to get your Taco Life!

DIRECTIONS:

Brown ground meat in a skillet.

IMG_3534

Once the meat is browned, add chopped kale.

IMG_3535

Then add tomato sauce, and the taco seasoning.

IMG_3536

Cook for a few minutes so that Kale softens but does not become soggy.


In a separate skillet brown tortillas. If you like your corn shells crunchy, add about a 1/4 inch layer of olive oil to the bottom of your skillet. Cook tortillas until they are crisp, but not hard. You can also warm them in a skillet without oil to make sure they are soft.

IMG_3539

Fill tortillas with cooked meat and top with your favorite toppings. Add a side of rice and beans if you so wish. Enjoy

These tacos were super delicious, all I could think about today was getting home and warming up the leftovers for dinner! What do you like to add to your tacos to make them your own?


Posted in Uncategorized | Tagged , , , , , , , , , , , , , , | 2 Comments

Homemade Laundry Powder Recipe and Laundry Routine

Since we live in our oh so humble abode, we do not have a washer and dryer in our apartment. That means that I get to go to the beloved laundromat. I do our laundry every week, rain or shine, wether I want to or not. I just can’t stand having a house full of dirty clothes, especially since it’s now two people’s clothing. That means that I have to take all of our laundry down 2 flights of stairs (2 & 1/2 when the car is parked in the underground car port.) So I had to come up with some tricks to make this a little easier. I carry our laundry down in 3 of these Ikea bigs. I love them because they carry a lot. I can throw them over my shoulder and carry all of it at once. Our clothes, towels, and sheets are already separated since our hamper is one with separate bags. That makes it better when I have to get up at 6 am to do the laundry…yep sometimes I get up that early to do it before work and to avoid the crowds.

image-2

The nice thing about going to the laundromat is I can get everything washed and dried at the same time. So the whole process is done within 1 &1/2 hrs. I fold all of my clothes at the laundromat, then I bring it home and put it away immediately. If I waited until later, it probably wouldn’t get done in a timely manner.

image

The laundromat struggle is real guys for a germaphobe like me. So I won’t use the table to fold my clothes, I fold them at the dryer. I know, it probably doesn’t make sense since there are germs everywhere there. But this makes me feel like I have at least a teeny tiny bit of control in this situation. This is part of why I have to avoid crowds. I mean it would be rude to take up dryers that someone else needed.

How do I get these clothes cleaned naturally? I use my DIY Laundry Powder.

IMG_3271

It smells good ya’ll, it smells real good. I also use Mrs. Meyers Dryer sheets which are the same scent as my powder. As you can see, these sheets are different than your average dryer sheets. But after I used them for a bit, I got used to them and I like them. They are pretty pricey too. It’s $8 for 70 sheets at Target. However I used to use several sheets of the old stuff. So the cost kind of balances out.

IMG_3272-1

To cut down on all the heavy items that I need to carry, I just bring enough laundry powder for the day. That means about 10 tablespoon sized scoops total which I carry in a small snack size zip top bag which I reuse. When I first began to make my own laundry powder,  I had to play around with the recipe a bit. (Let’s not even go into my very first homemade laundry liquid detergent which was a TOTAL FLOP!) Here’s the thing, this powder works a little differently for home machines than laundromat machines. The key is to put it in directly with your clothes. Most larger capacity laundromat machines instruct you to put the powder in a separate compartment. But this dilutes the homemade powder and makes it less potent.

DIY Laundry Powder Ingredients:

Borax

Super Washing Soda

Mrs. Meyers Scent Booster Crystals (If you don’t care about going totally natural, you can use other brands which are a lot cheaper.)

Zote Flakes (Let me tell you, when I found these Zote Flakes at Walmart I was so excited! I was not looking forward to grating bars of soap so this saved me a lot of time and effort)

Recipe: (Keep in mind this recipe can be modified depending on the size of your container)

1 Full Box of Zote Flakes

3 Cups of Super Washing Soda

3 Cups of Borax

1/2 Container of Mrs. Meyers Scent Booster

Mix all ingredients until combined well. That’s all, it can be done in less than 10 minutes! If you prefer a stronger scent, add all of the scent booster. (I am trying to stretch it as much as possible. The bottle is about $10 making it the most expensive purchase for this.)

You can use 2 tablespoon sized scoops for a regular load and 3-4 tablespoon sized scoops for larger loads.

If this exact recipe doesn’t wow you at first, fiddle with it a bit. I used several recipes that I found on Pinterest to come up with this. But it took a few tries for me to make it fit my needs. Remember, “going natural” takes some trial and error. But now I love this stuff, and I don’t plan to go back to using store bought brands as long as I can help it. I purchased all of these ingredients 6 weeks ago, I still have enough already prepared laundry powder for another month or so. I also have left over Borax, Washing Soda, and Scent Booster. So when I am ready to make more, all I need to purchase is the Zote flakes. My total initial cost for everything was under $25. I think that’s a pretty good deal!

Do my clothes have the same strong scent that you would get with commercial detergents? Nope. However I have been using natural store bought detergents for a while, so I am used to a more subtle scent. My laundry still smells very yummy to me though folks. So I’m sold.

Posted in Uncategorized | Tagged , , , , , , , , , , , , | Leave a comment

A Semi-Homemade Indian Inspired Meal

Now I know that if I was Super Homemaker I would cook all of our food from scratch. I’d slave in the kitchen for hours on end to go through every step in the process to make the perfect homemade meal. However with my life circumstances that just isn’t always a realistic option. On most days I have to cook dinner before work or after and I only have about an hour max to prepare and cook the meal. So I tend to find stores that provide pre-made sauces and ingredients and use that to supplement or provide a base for my meals. This meal is a great example of that.

photo

Chicken Tikka Masala

Ingredients:
1 package of Boneless Skinless Chicken Breasts

1 Jar or Fresh and Easy Masala Sauce (I have tried a couple brands and so far this one is the best to me)

Instructions:

Cube chicken then brown in a skillet. Once chicken is cooked add the jar of sauce. Cover and let simmer for 5 to 10 min. You want the flavor to get into the chicken.


Rice with Peas

Ingredients:

1 ½ cups of basmati rice

2 ½ cups of water

1 tablespoon of olive oil

A pinch of salt

Garlic Powder

1 teaspoon Seasoning mix without salt (Ex. Mrs Dash, TJs 21 Seasoning Salute, F&E 22 Seasoning Blend)

1 cup of peas

Instructions:

Put all ingredients (except for the peas) in a small pot. Stir to combine the seasonings and oil with the rice. Cover the pot with a lid but make sure that there is some space for the steam to be released. Cook for about 15 min on medium heat. Check rice texture. If it needs more time but the water is gone at ½ cup of water and keep cooking until al dente.

Transfer rice to a bowl. Then cook the peas in the same pot with ½ a cup of water and season as desired. Be careful not to over season.  Once the peas are done drain any excess water and add the peas to the rice.

Garlic Cheese Naan

Ingredients:

1 package of Stonefire garlic naan.

About ½ a cup of sliced Mozarella. (Shredded is fine too)

Put down one piece of naan. Cover that piece with mozzarella. The cheesier the better! Then place the other piece of naan on top. Brush with olive oil. Place in the oven at 400 degrees. Cook for about 5 min until the cheese is melty and gooey!

Plate and Enjoy!

Posted in Uncategorized | Tagged , , , , , , , , , | Leave a comment

Setting your Expectations when Transitioning to Natural Living

fontcandy

So you’ve decided that you want to live “naturally”. You want to incorporate homemade cleaning and beauty products into your life. You want to cut back on artificial fragrances, colors, and flavors. You are ready to go all in and get rid of anything that you see as unnatural. You are expecting all of these changes to completely transform your life. You are ready to live like Adam and Eve, your life will be as beautiful and free as it would be if we were back in Eden.

Then you try your first homemade product…and it sucks. Now, you have watched tons of natural youtube videos, you’ve got your own Natural Products page on pinterest. You are completely committed to this new life, you heard of how this DIY project made your friends everything more filled with joy and sparkles. So you are going to stay the course. You try something else, and…it’s another flop. Ok maybe you should take a little break on the DIY household and beauty products. You decide to make a new cooking recipe omitting the bad stuff and just using natural stuff with real food ingredients. But something tastes…funny. This is about the time that you question if this is really all worth it. Why don’t you have the same results that I had before going natural?

I have definitely had to make some adjustments when taking steps towards going natural. Here’s the thing. Living life more naturally can be pretty awesome. When your body becomes adjusted to the changes, it’s definitely a better way to live and it’s worth it. But it takes time, patience, and realistic expectations to really make the change successfully.

Don’t expect anything that you try to taste, smell, or feel exactly like the artificial, synthetic versions that you find in the store. How many of you had to take Dimetapp when you were a kid? Do you remember the disgusting “grape” flavor that it had? To this day I still cannot eat drink or even smell grape flavored anything, it makes me sick! Now think about what a real grape tastes like. The flavor is subtle but delicious and downright refreshing! This is a pretty great example of the adjustment that must be made when going from synthetic to natural. If your idea of what grapes taste like was based on grape dimetapp, you would probably be disappointed to taste the real thing. The same thing can be said for the “real” lemon lime flavor of Sierra Mist compared to fresh squeezed lemon and lime in sparkling water. There’s really no comparison.

Unfortunately our senses are so overstimulated by the man-made inferior imitations of what God has created in nature. Some people prefer the smell of “Lavender” Febreeze over the smell of a few drops of Lavender essential oil in distilled water. Yes the scent of Febreeze lasts longer. But that it because of the hazardous chemicals that are used to sustain that smell. These chemicals can cause hormone imbalances amongst other unsavory side effects.

Over time, your senses will adjust. Now, when I smell artificial fragrances it almost makes me sick and sometimes gives me a headache. When I use chemical laden toiletries and cleaning product, I have allergic reactions. When I taste foods or drinks with artificial dyes, I can literally taste the bitter flavor of the dye.

In addition homemade natural recipes, for food and products, require a willingness to adjust and some experimentation. When a new mainstream product is made there are numerous test groups, there’s lots of trial and error, people are paid solely for the purpose of coming up with the most widely accepted version of it. If it isn’t successful, it is canned after a short amount of time. When you see a new natural recipe on Pinterest with some rave reviews, you cannot expect to have the exact same feelings about that recipe. If works out for you right away, more power to you. But more than likely, you will have to work at it a bit to find the recipe and variation that works best for you and your family. The good thing is, most ingredients used for natural products are relatively inexpensive. Here’s the arsenal that I started with.

So get out there, start experimenting, be patient, set realistic expectations, and go natural!

What’s a recipe that you may have failed at before you succeeded? Are there any natural products that you can think of that did NOT work for you? Please share, we’re all growing and learning here. 🙂

Posted in Uncategorized | Tagged , , , , , , , | 6 Comments

My Favorite Things Birthday Party

Well today is my 32nd Birthday! I am not doing anything big this year. I usually like to do a big party with lots of planning involved. But after my wedding, I have kind of taken a break on planning things. I will get back in the groove some time soon though. Plus we are working on moving…not that we have a place yet. That’s a whole different story that I won’t even get into right now. So this year we are keeping things pretty mellow.

Anywho in celebration of my birthday this year I wanted to share what I did for the big 3-0. This was one of my favorite birthday celebrations (pun intended), and it was a Favorite Things Party! Since I didn’t have a blog at that time, I didn’t get a chance to share any of these fun pictures. So what better time then now?

What is a Favorite Things Party you ask? Well it’s based off Oprah’s Favorite Things. The short version: It’s a party where everyone brings a few of the same favorite thing and by the end of the night, everyone gets to go home with a few gifts! Yeah baby! The long version: Each guest brings multiples of the exact same thing. The amount is up to the host, but it is usually between 3 and 5. A price limit should be set so that the gifts are in the same range. Then you pick 3-5 people (the method for choosing these peeps is up to you.) and those people get to go home with that item. This is a great time to find out about new products and such because each guest explains why this product is their favorite thing before they give them out. How awesome is a party where everyone gets to go home with a few great surprises?

So I sent out the invites, yep that’s right. I sent old school invites through snail mail! I bought these brown envelopes from Michael’s because it made me think of the song, “My Favorite Things”. You know, “Brown paper packages tied up with string.” But they needed a bit more sparkle, and of course I had to include my favorite color pink! So I bought a roll of this sparkly paper and cut it out to use as an insert to make the envelope shine. This tutorial can help you achieve the same look. Here’s what mine looked like. The invitations were sent with basic information. Then the ladies who RSVP’ed received an email with all the rules for the game.

IMG_0114

Please excuse the camera phone picture.

I wanted to incorporate my favorite colors as well, since this party was all about what I loved. My colors were pink and turquoise/teal. I purchased many of my decorations from Michael’s and Party City and I used personalized touches that I ordered from Vistaprint to make everything truly mine.

IMG_4488

I purchased these hanging decorations from Michael’s. The tablecloth was a shower curtain that I had.


IMG_4296


IMG_4401

IMG_4298

IMG_4288

Little pops of pink and turquoise helped to carry the theme throughout all the areas.

IMG_4347

I made sure that my outfit was similar to the color scheme as well!

When they ladies walked in, there was a table with name tags. The name tags said, “Hello I’m _____ and I’m one of Angela’s Favorites.” There was also a small basket and 3 slips of paper with each lady’s names on them. The directions were on the table in a picture frame. The ladies were instructed to place their names in the basket.

IMG_4326

The gifts were placed on a table and next to the table were the bags that each lady had for the gifts that she received.

IMG_4316

IMG_4328

Some of the ladies wrapped their gifts. This is not necessary though.

IMG_4390

Here is one of the bags with the recipients initials. The little card on it reads, “I simply remember by favorite things…”

While we waited for all the guests to arrive, we had some of my favorite foods to munch on. Unfortunately we didn’t get a picture with the food uncovered. But you can get an idea of what the table looked like.

IMG_4319

I added rhinestones to the top of my plasticware because I love sparkles!

IMG_4331

The menu cards say, “Angela’s Favorite.”


IMG_4309

My wonderful boyfriend (at the time) helping out!


IMG_4299

Homemade Blueberry and Mint Lemonade.


IMG_4293

My beverage cart. The cups had labels on them so each guest could write their name.

Once everyone arrived we started the game. I began by giving everyone my gift which was homemade mint and lavender bath salts.

IMG_4387

For my party, each guest brought 3 of their gift. One for the birthday girl and 2 to hand out. I set a limit of $7 value for each gift. After I handed out my gift, I picked the person to start. Each guest shared a funny story about me then she talked briefly about her Favorite Thing. She picked 2 names out of the basket, and those two ladies received the gift. We just went on like this until all the gifts were all given out. There were a couple hiccups when the same name was picked. But we made it work.

Some of the gifts were: homemade body scrubs, lotion, candles, lottery tickets, devotionals, wine, jewelry, nail polish, eye lashes, homemade hair accessories, lush bath bombs. They were great!

Then of course we had to have my favorite cake. White cake with fresh strawberries and whipped cream frosting.

IMG_4463


As you can see, this is a fun party theme that can be easily done. You can do this as a Christmas gift exchange or for an informal get together. There are so many great ways that you can make it your own! After reminiscing about this event, I want to do another one soon!

Have you ever been to a Favorite Things Party? If so, what kind of gifts were handed out?


Posted in Uncategorized | Tagged , , , , , , , , , , , , , | 2 Comments

How to Care for Kinky Hair

fontcandyPerhaps you have a child who was born with kinky hair but you have straight hair. Maybe you just adopted a child with kinky hair. You may be a parent who has relaxed hair and you are not sure how to take care of your hair in it’s natural state. Or maybe you’re a caregiver who recently started working with a child with this texture of hair. Whatever the case, there are definitely many people who would benefit from this information.

I recently encountered a sweet mom at my job who has straight hair but she has a child with Kinky Hair. I was wearing my hair in a twist  out, so she immediately noticed how my hair was similar to her daughters texture. She mentioned to me that she sometimes has a challenge when trying to take care of and style her daughters beautiful kinks. I tried to share a few quick tips with her, but I realized that explaining how to care for kinky textures is not easy. This was my inspiration for this blog post.

*Please note: I am not a licensed beautician or a natural hair guru. I am just sharing things that I have learned over the years to take care of my own hair. It is always great to look for a natural stylist in your area who can give advice based on actually seeing and touching your hair*

1. Try to avoid using negative words when describing the child’s hair. Saying that your child has crazy hair, bad hair, wild hair, or anything similar can seem harmless. But this teaches your child that their hair is a problem to be fixed and not a beautiful part of themselves that should be celebrated. I still remember how bad I felt when I had classmates who asked me why my hair doesn’t move when I was a kid. These words stick, and help to form the self-image that a child has.

2. Moisture is key, but make sure that it is the right kind of moisture. When I was younger we “greased” our scalps. That meant we used petroleum based pomades and oils on our scalps. Now I know that this was not a good choice. You can easily make your own hair (and body) oil from mixing different oils like this one. If you do not want to buy all of those oils at first, then you can make a mix with coconut oil, olive oil, and jojoba oil. All can be found at stores like Trader Joes or Sprouts. You can also occasionally spray the hair with water to add more moisture. Then apply your oil mix, then you can seal it all in with a nice shea butter mix like this one. Oils should be applied daily.

3. Do not wash their hair more than once a week unless absolutely necessary. Our scalp naturally produces its own oils and this is helpful in keeping our hair moisturized. When you wash too frequently, kinky hair becomes dry and then it breaks off. When washing kinky hair, use products that are organic, natural, and not filled with chemicals. Trader Joes makes an inexpensive organic tea tree shampoo and conditioner that can work well. Also remember that you do not need to use shampoo at all. Shampoo can strip the hair of oils. Hair can be cleansed just as well using conditioner in the place of shampoo. (This is called a co-wash) Shampoo can be used when there is a lot of product build up on hair.

4. Deep Condition regularly. Find a deep conditioner that you like and do this weekly with your wash routine. This will help the hair receive necessary nourishment which will build strength and prevent dry brittle ends which will result in breakage.

5. Protect kinky hair at night. Cotton pillowcases can be drying and damaging to hair. Wearing a silk or satin cap and/or sleeping on a silk or satin pillowcase can help to protect the hair at night. These can be purchased at most beauty supply stores.

6. To manage Kinky hair, braid or twist it after washing and detangling. Kinky hair will become tangled when not taken care of properly. Braiding or twisting it can keep it under control, minimizing the need to detangle before the next wash. Here is an example of a style that can be relatively easy to do with practice. (However I do not suggest using the kind of brush that she used in the video to detangle hair.) This is the best way to maintain their hair between washes. A spray bottle with water can help to manage hair when braiding or twisting. I also like to add some Olive Oil to the bottle for extra moisture. Spray each section before combing or brushing. Then style.

7. Use the right tools! As I just mentioned, some combs and brushes can be harmful to kinky hair. Fine tooth combs are no good. They will break the hair when trying to detangle. Use a denman brush or a wide tooth comb to help get through the tangles. NEVER rake through the hair, be very careful and gentle when detangling so you do not rip the hair strands.

8. Shea moisture products are easy to find, relatively inexpensive, and natural. I always like to encourage people to try these products out because they are so easy to find and there are numerous options for different hair types. You can find the Shea Moisture lines at Target, Walgreens, CVS and many other stores. Please do not stop at just one product if it doesn’t work for you. I had to try a few before I found my staple. Feel free to check other brands in addition to Shea Moisture products.

9. Be patient. Unfortunately mastering kinky hair takes time for most of us. We have to try multiple products, multiple combinations of products, and different methods before we find the right fit.  Do not give up or be discouraged if it takes time for you to find what works well for you. With practice and patience, it will get better. I used to get so frustrated with my hair, but now I literally LOVE it! It took me a few years to get to this place.

10. Youtube videos are your friend! Most of what I learned about my kinky hair I learned from watching Youtube videos. I watched ladies like Naptural85, Kimmaytube, MahoganyCurls, and Simplyounique. But there are SO many more for you to check out. When doing this, it is best to find someone with hair that has a similar texture to the one you are styling. (YES there are many different textures among those of us with kinky/curly hair!) Some rules apply to all kinky/curly textures. But some methods, tools, and products will work better with specific hair types. These videos will also give you a better understanding of kinky hair overall.

I hope this provided some insight, encouragement, and help for those of you trying to figure this all out. This advice is just some basic, surface level advice to help you get started. But never stop learning, as I said, this is a process.

Please share this with anyone who you think might benefit from this information. Also if you have any hair tips or suggestions that you think would be helpful, leave them below in the comments. It will take work from all of us to change the culture for those with Kinky hair and to help people see that this hair type can and should be celebrated!

Posted in Uncategorized | Tagged , , , , , , , , , , | Leave a comment